airbrushtutor
Love Spreading Overseer
I've been dedicating my spare time recently to painting male skin! I think it's probably the hardest texture and subject to paint, it's certainly what challenges me the most and i thought i'd share my method of how i actually practise and the results i'm getting.
1. The base skin tone
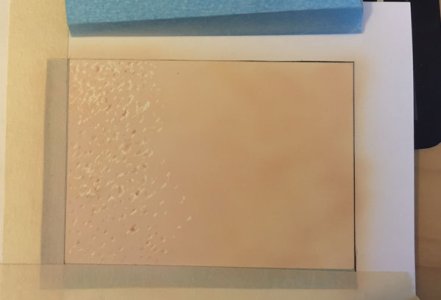
2. Overlying transparent
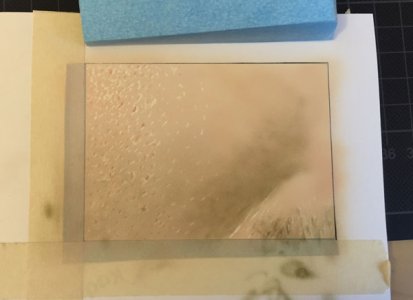
3. More transparents and texture in between
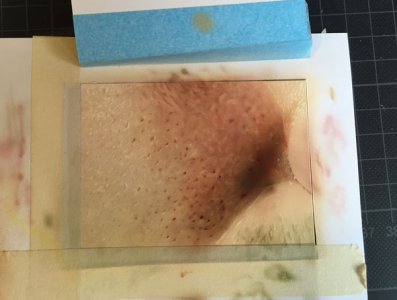
4. Shadow tones for accurate judgement of contrast
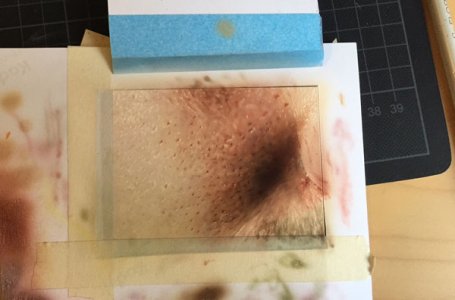
5. First result Vs. Second result
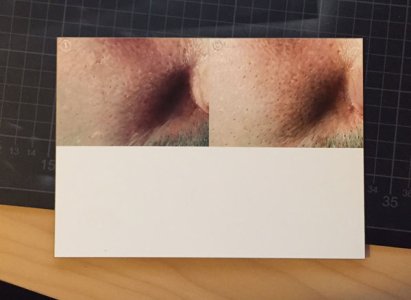
I'm using com-art on a 5x7 inch piece of Claybord. The first image was done using a matte photo reference and i found it had a lot les detail and was quite a bit darker in color, hence the darker result.
The first image was done starting with the lightest skin tone as an opaque, i then added textures and mixed another mid-red opaque for the are at the top of the image and to the left of the nose. I added textures with the airbrush only in this layer. I added a small amount of black to the airbrush and sprayed the inner shadow color, slightly texturing.
Finally I used a little stencil to create the detailed black hairs.
For the second image i used a glossy photo reference. It was lighter in appearance and certainly brought up alot more of the detail.
I began by laying down the base skin tone color, however upon matching it once i began spraying it i found it was too dark, so with the color in the brush i added a couple of drops of white and went ahead and sprayed, hence why the left side of the first photo is lighter then the right side.
I immediately added textures using a blade, spending around 20 minutes adding the most obvious and any underlying textures.
From here on i used all transparents and I'm finding i much prefer to work this way with my Claybord and Com-art combination. I'm able to erase the top transparent color to reveal the opaque underneath, which is important in some areas.
I mix a greenish transparent and lay it on the bottom left of the image (subtly) and to the left of the nose.
Next i mix a mid-red transparent and lay down the obvious color on the top and middle of the image - that blood red color. I lay it down with few textures, just adding it like i'm coloring in those parts of the image.
Now the fun part begins as i pull out my hard 'Florett' eraser - it's like those faber castell erasers but it's slightly tougher. It can't do the sharpest textures but you can use the edge of a shield to help you with that. I create 95% of the textures with that pencil eraser and a blade for the sharpest whites.
The final step is to use a stencil to add his little black regrowth hairs.
There was a heavy use of figure 8 textures in each image - imperative for a realistic looking skin tone.
I've found that using an opaque base lays down a nice foundation for the image and mixing the top colors with transparents on the board allows for much more effective erasing, which is what create the realistic textures.
I don't think i'll ever reach a point where i'm happy with the result but i think it looks as good as I'm capable of doing at this stage.
Obviously i've done the same image twice and by doing this you generally always see a better second result, but for me it also solidifies a method of doing something. if i'm not happy with an outcome or i feel something could be improved i'll do the same thing a third time.
The next step is to move onto different parts of the image and try to nail those textures, which i think will be much easier now that i have a clearer method of approach.
Anyone can do this, it's all technique and just gets easier with practise.
1. The base skin tone

2. Overlying transparent

3. More transparents and texture in between

4. Shadow tones for accurate judgement of contrast

5. First result Vs. Second result

I'm using com-art on a 5x7 inch piece of Claybord. The first image was done using a matte photo reference and i found it had a lot les detail and was quite a bit darker in color, hence the darker result.
The first image was done starting with the lightest skin tone as an opaque, i then added textures and mixed another mid-red opaque for the are at the top of the image and to the left of the nose. I added textures with the airbrush only in this layer. I added a small amount of black to the airbrush and sprayed the inner shadow color, slightly texturing.
Finally I used a little stencil to create the detailed black hairs.
For the second image i used a glossy photo reference. It was lighter in appearance and certainly brought up alot more of the detail.
I began by laying down the base skin tone color, however upon matching it once i began spraying it i found it was too dark, so with the color in the brush i added a couple of drops of white and went ahead and sprayed, hence why the left side of the first photo is lighter then the right side.
I immediately added textures using a blade, spending around 20 minutes adding the most obvious and any underlying textures.
From here on i used all transparents and I'm finding i much prefer to work this way with my Claybord and Com-art combination. I'm able to erase the top transparent color to reveal the opaque underneath, which is important in some areas.
I mix a greenish transparent and lay it on the bottom left of the image (subtly) and to the left of the nose.
Next i mix a mid-red transparent and lay down the obvious color on the top and middle of the image - that blood red color. I lay it down with few textures, just adding it like i'm coloring in those parts of the image.
Now the fun part begins as i pull out my hard 'Florett' eraser - it's like those faber castell erasers but it's slightly tougher. It can't do the sharpest textures but you can use the edge of a shield to help you with that. I create 95% of the textures with that pencil eraser and a blade for the sharpest whites.
The final step is to use a stencil to add his little black regrowth hairs.
There was a heavy use of figure 8 textures in each image - imperative for a realistic looking skin tone.
I've found that using an opaque base lays down a nice foundation for the image and mixing the top colors with transparents on the board allows for much more effective erasing, which is what create the realistic textures.
I don't think i'll ever reach a point where i'm happy with the result but i think it looks as good as I'm capable of doing at this stage.
Obviously i've done the same image twice and by doing this you generally always see a better second result, but for me it also solidifies a method of doing something. if i'm not happy with an outcome or i feel something could be improved i'll do the same thing a third time.
The next step is to move onto different parts of the image and try to nail those textures, which i think will be much easier now that i have a clearer method of approach.
Anyone can do this, it's all technique and just gets easier with practise.
