K
King-Panther
Guest
Whafs the difference in terms of end result of work?
Thanks fit the reply, but spraying furniture with a professional finish.If I might ask, what are you intending to use either of these sprayguns for?
As this is an airbrush forum, I would use these for either canvas or Bristol board preparation, that is, adding layers of gesso to them, or laying large area block colour.
Brilliant, thanks. Do you know o any decent tutorials for automobiles - I might do my car.As I have not yet sprayed furniture, my experience here is very limited.
However, I have sprayed auto panels and some other large objects.
It has been my experience that if the prep work is done correctly, and the makers instructions followed, the end result will be professional looking.
I'm going to assume that you're talking eurothane or varnish type finishes?
If this is the case, then you'll need to learn to apply both mist and "wet" coats, about the same as auto panels.
If you can already do this, then you should be on your way to 'pro' standard finishes.
The rest is polishing and buffing, to give that mirror finish you see in the showrooms.
I've been looking it up this morning, and I've learned:Check out You-tube for vids or wiki-how for more info on preparation of auto panels.
Should see you right!
Cool. Im still looking for an air compressor, so i'll post it before I purchase it, to get done advice.As with all spray guns, the finer the needle, the better the atomisation.
This will result in the best finish.
There are, however, some things that you need to be aware of.
Some primers and bases require a larger needle due to its pigment sizes, and this will need to be hand finished i,e buffing, sanding or polishing.
Larger needles will allow for more rapid application, but the surface finish is not always the best, particularly when it comes to surfacing lacquers.
In this case, 1.6 for bases, 1.4 for primers / fillers etc, and the 1.0 for the lacquers.
Be aware that air pressure for these things are CRITICAL and the manufacturers instructions should be followed as EXACTLY as possible.
Try also, to keep to the one system, as many are NOT cross-compatible and may cause you to have to scrap what you've done and re-work the whole piece.
Please remember that a good finish requires top notch preparation.
If it fails there, the rest will be worse.
Get the prep done as well as you can, follow all the makers instructions, and you'll get a first class result.
These things take time, so don't be too impatient.
There is some really good advice and opinions in the Forum heading "Compressors"!
It's worth checking out what other members have to say on them.
The gun you see in the opening scene is a "pressure" gun, meaning it is fed [by air pressure} from a storage 'pot' that is elsewhere on site.
The gun that has the cup on top of it is 'gravity' fed, meaning that gravity feeds the paint or whatever else you're spraying onto the needle and the air blows it out through your nozzle.
You are correct in identifying the gravity fed gun.
When you change needle size, you must also change nozzles to match, otherwise your goingto have major problems.
This applies to all air fed spray equipment.
......
")
Ok.
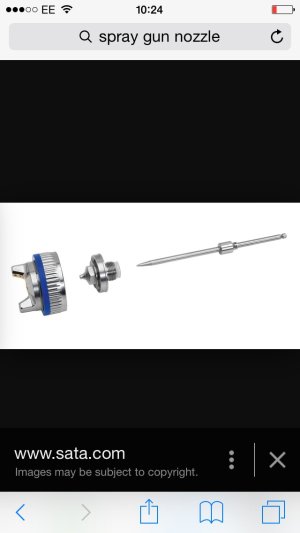
In order, you have here:
1. Cap
2.Nozzle
3.Needle
These are the three critical things that control your spray - along with air pressure - of course.
Each needle point is matched to it's partner - the nozzle.
These 2 then fit inside [ reads - through ] the cap.
The gap between nozzle and cap is where the air passes out of the spray gun - via a set of holes.
It's important that these holes are kept clear - otherwise no spray.
The trigger moves the needle into and out of the nozzle and it allows paint to be siphoned off from the cup and fed into the airstream between the needle point and the cap. It's here that atomisation occurs - at the needle point and the jets of air coming from the cap compress it into a fan shape.
The fan shape is determined by the needle /nozzle combination - hence the larger the needle/nozzle set the larger will be the fan spread.[Distance from the bottom of the spray pattern to the top].
This is the simplest explanation that I can give you, and I'm sure that if you have read all the info from the Devilbiss site on their guns, you will by now, have a good understanding of how each type works, what it's delivery capacity is and what each type of gun is capable of.
From this information, it should be relatively easy for you to choose the one that'll suit your requirements.
I hope this helps get you sorted.
An air compressor that produces 13.6 CFM is almost a shop compressor, and yes it will be heavy.
Question? Are you intending to set this up as a buisness, or are you a keen DIY kinda person?