Iwata Kustom CH

Z

zimmer

Guest
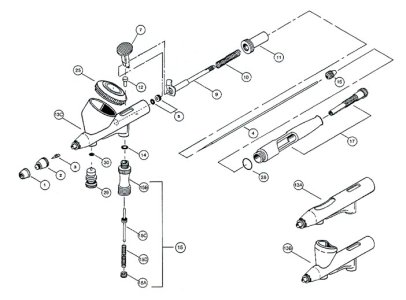
My CH is about 2 years old. Recently it leaks air badly when the trigger is depressed. The air is blowing straight up through the body past the trigger. The only o-ring shown on the parts list is over the air valve to prevent leaking around those threads. This is sealed fine it is coming up around the trigger. It seams there should be another oring to seal around th trigger where it goes through the body to the air valve but there is not and it is not on the diagram. HELP PLEASE.
 
one on the air valve guide and one in the body its a little bugger and very easy to %$%#$# up taking it in and out order 2.. these are not solvent proof so you want to go easy when cleaning the inside of the body Mine are well over 5 yrs. old and I haven't had a problem just keep them very lightly lubed
PS I just looked at the blowup for the kustom at coast It does not show the air valve assembly.. check the regular hpch diagram for the parts
 
Last edited by a moderator:
The one in the body is not on the parts list and I have no idea what to order. Any suggestions on a part number?
 
All of the Iwata's, except for the eclipse line, have that same guide o ring. Check that, not sure about the revolution line, or anything not in the normal custom/kustom lines.
 
HP_HILINE_Schem.jpg
I'm not talking about 14 that seals around the threads. The air is leaking in the body around 12. There doesn't seem to be anything that keeps the air from flowing that direction other than the fit of 12 in that hole in the body and that is metal on metal.
 
@zimmer , When your air valve assembly is in it's place that little ring part No.14 should compress and wrap snugly around part No.12, if you have checked that ring and it's OK, my guess is that the air channel going to the front of your airbrush body just under the nozzle is partly or completely blocked, if this were so, the air has nowhere to go except up through the trigger housing,, this easy to check and clean out with a very thin dental brush (looks like a mini bottle brush), when I do a strip down of my own brushes, I always clean that too, you would be amazed at the muck that comes out of there, especially if you haven't done that for two years.

The cure is very simple, check that as I said and to be sure, also replace part No.14, since it's also possible that although it may look OK, it is simply weak from age, as mentioned previously it is not solvent proof.

Aside from an air channel blockage and a faulty or damaged O ring, there is absolutely no other reason air could be coming out through the trigger compartment.
 
Does 14 go on top or on bottom? The diagram shows on bottom, air valve side, but looking in the brush there is a groove that looks like it should go on top, trigger side. Replaced and still leaking. Will try cleaning that passage next.
 
Does 14 go on top or on bottom? The diagram shows on bottom, air valve side, but looking in the brush there is a groove that looks like it should go on top, trigger side. Replaced and still leaking. Will try cleaning that passage next.

14 goes on top of the air valve under the brush as you see it in the diagram, if cleaning the chanel doesn't fix it, your ring is either faulty or the wrong size, when everything is in place, the ring should compress onto the base of the trigger creating a seal.
 
They are brand new from Coast unless they sent the wrong ones.

I just read your post under the diagram again, it is not the intention that the O ring goes around the threads on top of the valve, you need to turn the airbrush body upside down and place the O ring into the ringular slot intended for it under the trigger housing, when you then screw on your valve, the valve pushes the the ring further into the slot and squeezes it around the trigger base, normally you would do this with the trigger out, if it's done correctly you will feel the trigger resist a little when you put it back, it is very important that the ring is precisely centred, if it isn't that could also block the air channel since the channel is a very small hole next to welded on bracket on outside of the female valve intake

If you haven't already cleaned the air channel, I would do that first before writing off the rings, as mentioned, the rings are the same for almost all of the Iwata range.
 
The only indention is on top of the body. See pics
jupuhy4u.jpg
4uvadyde.jpg
 
second pic shows the seal It is REALLY dirty the seal fits in the slot that one comes out of.. If you ordered the seal for you mac valve #30 in the pic above you need to get the proper one JUST CALL COAST they will set you up The one shown in your pic(#2) is #%$# up Also quit using windex or anything with ammonia. That is what is eating your chrome (unless you like that broke in look) It is hard to get in and out without damage that is why I suggested getting backup I think they come 2 to a package but I have been known to be wrong
Good luck Kurt out
 
Last edited by a moderator:
There is no seal. I tried applying some bees wax to see if it was my imagination or the air was coming from there. That is nothing but metal and bees wax. I ordered the correct number on the diagram but it is twice the size of that hole. Thanks for the help now I know what to look for. Windex was used a long time ago before I knew what it would do.
 
The only indention is on top of the body. See pics
jupuhy4u.jpg
4uvadyde.jpg
The bees wax in the second picture, did you apply this before or after your problem started? if it was before I think it's a good bet that you have bees wax pushed into the air channel that I mentioned earlier may be dirty, to be honest the bees wax around that hole isn't even necessary, it will also interfere with your O ring's ability to create a seal.

You need to first clean everything out of the area in the second photo and generally never put anything in there that wasn't in there when you first bought it, and again be absolutely sure that there is nothing in the air channel (looking at this now, it's a strong possibility that there is),when your satisfied everything is clean, place your O ring over the pin protruding from your valve assembly, looking again at the diagram the ringular space seems to be between the pin and valve assembly body so your ring should fit in there nicely.

I would advise once again a new ring because if the last ring was in contact with the bees wax, there is a good chance that that is now dis-formed and may not be able to create a seal.

My apologies for not being able to answer this earlier, but I'm in a different time zone and just got home form work, I hope you get it figured out, if this still doesn't give you a result, perhaps you can send it to Iwata dealer for a service and tune up.
 
The wax was after the problems started to try and seal the area and make sure that is where it was coming from. The indention is between the trigger pin nd the body on top. I think it is going to have to go for a recondition
 
Maybe give Coast a call and see if they can talk through it with you and let them make a recommendation. They have some very knowledgeable people when it comes to trouble shooting.
 
Back
Top