Airbrush Troubles

Is this Valejo model color, or ModelAir ? On model building forums this is a commonly asked question. With regular Valejo model color, you can make it work with a delicate balance of thinner, and flow improver. Model Air works better in an airbrush. Are you getting a build up of paint on tip of the needle?
 
Im sorry but can you run me through it? Im a newbie and have no idea whats what. Im still learning.

As Robby suggested it could be 2 problems you are experiencing.

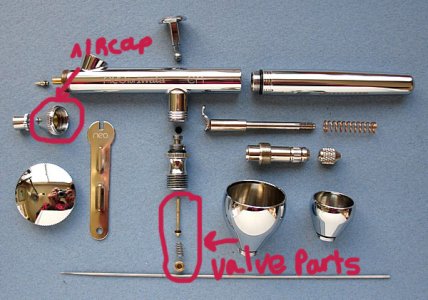
Firstly, have you downloaded the blown up picture of the neo?

Neocnparts1.jpg

The air cap (the larger threaded part above the cup lid in the pic) may be too tight and all you need to do is loosen it a fraction. Check the airbrush, has it cured the problem?

The trigger issue: You will see in the pic above the needle the small brass screw, the spring and the valve pin with the o ring on it. That's what is inside the air valve. Take it apart (you will need a small hex/allen key), check that the rubber o ring is ok and that there is no other visible damage. If its ok put it back together. When you tighten the small brass screw keep checking the trigger is returning to the top (not sticking like it is at the moment) if it is sticking still, tighten it a little more to add pressure to the spring. This in turn will push the pin with more force and push the trigger back up to cut the air off when you release the trigger. Do this until the trigger returns correctly. Has this made sense to you ?

Let us know.

Lee
 
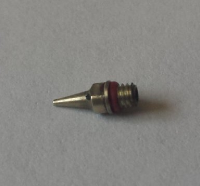
This bit seems to be sticky when i put the needle into it. How do i clean it?
That's the nozzle .... :)
I had thought that you had cleaned it out from your earlier posts... Guess that was a misunderstanding lol.
I'm sure that's the source of your not spraying right issue.

Lee has done a good job explaining the air valve.

Only thing I'd add is, maybe upload some pics of yours when it's apart.

And you may end up having to wind the spring tighter a little. As many do. Since it seems that some tend to sort of spread out and drag against the air valve walls.
 
Just took it all apart soaking cleaning it with thinner and being carefull of seals. But still no luck. Trigger is still sticking and still not much coming out even with compressor at high.
 
Thinner isn't going to get the crud out of the nozzle.

Restorer will do better...or vodka.

Then youll need to use a sliver of a toothpick, or just a few bristles of a brush to gently scrape the crud out.
 
I might have it now. Put a lil vodka through and its starting to splutters with crud come out and spraying better
 
Keep working on it. Those things will hide a surprising ton of crud.

You'll probably have to soak it a bit/ use something semi soft to scrape in their and really get it all out.
 
Ok,
lets get you educated on what part is what, so we are all talking the same language.
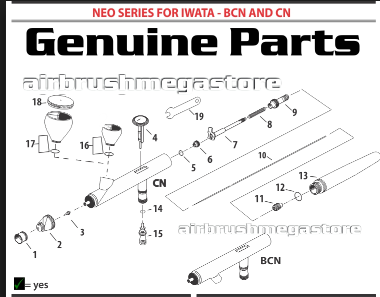
upload_2018-10-22_6-54-49.pngupload_2018-10-22_6-55-40.png

So........
what you thought was the nozzle (#2) is an nozzle cap.
as for the nozzle, please dont just soak it, put it back on the brush and blast away. if there is crud in there then all you're going to do is fill up the hole again. If your nozzle is dirty then as suggested, soak it..... for a few hours.... Createx restorer is a great product, way better than thinners. its reusable so its economical, just get a small glass jar / solvent proof small plastic container and put some restorer in it, remove the seal from the nozzle, put is somewhere safe, and drop the nozzle in the liquid (trying to make sure you dont have an air bubble in the nozzle) and go and find something else to do for a few hours.
When you return, remove the nozzle, grab a long bristled artists brush and 'poke' inside the nozzle to aggitate the paint that will be sitting on the inside. you can push a few bristles of the brush through the hole and get paint worms if there is enough stuff in there. Once you've done that, put it back in the restorer and leave it again for a few hours. Repeat as above.
Be warned, this is fiddly and can be frustrating for some.
Once its had its double dose bath then rinse, replace the seal and put back on your brush.
You're not done yet, so dont go filling up with paint just yet!

Sticky trigger:
As suggested prior, check out the thread that was linked and read all of it, not just the first few posts, it seems to be a common problem but easily remedied.
The air valve assembly is #14 & #15 on the diagram.
aside from possibly the spring causing grief as described in the thread it is possible that the o-ring (#14) has swollen due to the thinners you have been using, if you have been a little overenthusiastic with it and it has spilled down the trigger. Its also possible that you have overtightened the valve body (#15) and its squashed the o-ring and its 'grabbing' the piston and not releasing properly.

You can certainly buy a replacement o-ring if you suspect that may be a problem but you can also do some hunting at the hardware store (or anywhere else you think may sell o-rings) and get a couple to put in your 'kit'

Wow, now I have writers cramp lol

Hopefully you will be on the way to a clean brush and getting the paint flowing and the trigger both into their happy places :)

I suspect the paint has built up over time and its now at a point where you're seeing problems and your use of thinners has leaked into the trigger area and caused the o-ring to swell.
 
14 in this case is just one of two orings.

The other one is not visible in the parts diagram. Only in the pics, on the brass pin, Just above the spring.

Also, if 14 has swollen from solvents, it's possible to let it dry a day or two and have it work again...maybe.
 
14 in this case is just one of two orings.

The other one is not visible in the parts diagram. Only in the pics, on the brass pin, Just above the spring.

Also, if 14 has swollen from solvents, it's possible to let it dry a day or two and have it work again...maybe.
yeah I had one o-ring swell on my hp-b+ when I first started and didnt know any better, tried letting it dry out but it was toast.
 
Back
Top