Createx "AutoBorne" Sealer/Primer: Your Experiences

GVW LEWIS

Double Actioner
Good Afternoon, :)

AutoBorne Sealer/Primer is one of the primers I seem to like the most in modelling applications, although I only have started some tests, just on plastic spoons and old sprues, bits and pieces. Createx say it is suitable for hard surfaces, so in terms of painting art proper, it may be only reliable to prime supports that are rigid, or mounted on a rigid substrate. I haven't tried that, though. I only tried on plastics for modelling applications.

The illustration below shows only the Sealer/Primer colours that I suspect will be most used, although they make also a strong yellow, a bright green and a "tan", which to me appears to be a Burnt Umber:
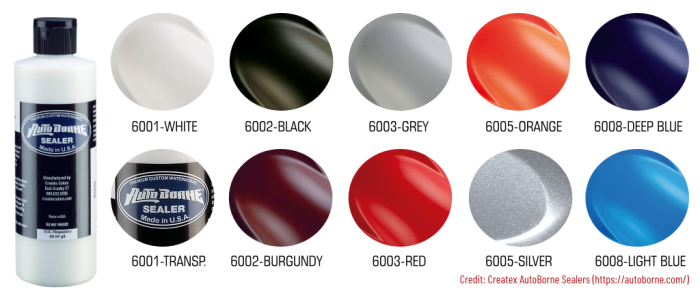
AutoBorne Colours Map.png

I only tested Code 6003-Grey. And I did not have their recommended thinner Code 4011, so I added 5% of plain home made thinner. But the outcome is 100% what you can see above. It self-levels as it dries, but it seems to me that it flattens further during the curing process, about a day or two.

I do not usually sand primers. I usually burnish/polish them very gently with this:

They are good and the natural choice for any Createx paint finish. But I wonder if anyone has experience of applying other paint brands (ie non-Createx) on top of these primers and if so, what was the result?

Thank you and best wishes :)
 
Last edited:
You can tint the sealers to your liking....

Hi @twood, thanks for the reminder. Yes, both tinting and intermixing colours to get a specific colour or a lighter value, etc. I assume this is AutoBorne mixing with AutoBorne or Createx.

My main concern here however, is whether AutoBorne (Createx) primers, once dried and fully cured, can be painted on with other colour brands, either modelling such as Vallejo, AK, Mission, in all their variants; or artists or studio grade paints, for example Old Holland, Lefrank & Bourgeois, Sennelier, Golden, Liquitex, Gerstaecker, Lascaux, Winsor & Newton, etc...

I wouldn't trust what can be seen with a naked eye. The paint film may look perfectly fine but six months down the line, fail because of unknown incompatibilities.

In traditional art studios, it is common practice to prime a canvas or a panel with an acrylic gesso or primer, regardless of whether one will be painting in acrylics or oils. It doesn't matter what sort of acrylic gesso or primer. So long it has dried and left alone to fully cure, it will be fine. We can paint in oils or acrylics on that acrylic gesso and it will remain stable because acrylic gessoes and primers targeted at the fine art studio crowd are designed to cope with flexible supports, rigid supports, mixed media and all sorts of stuff that go on in the modern studio.

AutoBorne may behave differently. I wrote to Createx yesterday, asking for a technical validation on stability of the primer film under paints other than Createx brands. I just wonder if anyone here experimented and if so, their view. :)
 
I've done a bit of modeling (1/12 moto gp bikes). I used Autoborn White, Black and Gray primers, and top coated with Tamiya acrylics, decanted spray cans, alclad metallics and chrome, as well as other Createx colors - mostly Illustration colors. Also, Badger minitaire paints and ghost tints... The finished pieces don't experience much handling once the build is complete, but I have not experienced any adverse effects that I can see - so far. I would say I have had more difficulty using Badgers Stynylrez primers than the Autoborne.
 
Createx are pretty open about saying that they’re paints are compatible with most waterbased systems. I don’t think you’ll have any problems using other manufacturers products.
I’m pretty sure I spoke to somebody who uses urethane paints over the cured Autobourne sealer. I can’t remember the exact conversation though.


Sent from my iPhone using Tapatalk
 
I've done a bit of modelling (1/12 moto gp bikes). I used AutoBorne White, Black and Grey primers, and top coated with Tamiya acrylics, decanted spray cans, alclad metallics and chrome, as well as other Createx colours - mostly Illustration colours. Also, Badger miniature paints and ghost tints... The finished pieces don't experience much handling once the build is complete, but I have not experienced any adverse effects that I can see - so far. I would say I have had more difficulty using Badgers Stynylrez primers than the AutoBorne.

Hi @DaveG, thank you for taking the time to share this. It is exactly what I am trying to establish, whether there are adverse side-effects when painting other brands over the AutoBorne sealer/primer.

It probably sounds "precious" to some that I am concerned about something apparently trivial, but I am thinking here about modellers building complex models, such as warships projects containing hundreds of parts, if not over a thousand parts on occasion. And others in the Arts, creating Fine Art which must stay permanent and stable.

Thanks again :thumbsup:
 
I have many customers that use AutoBorne Primers with other paint brands from scale models, 3d print/coz play to automotive with no adverse effects.

Hi @Maple Art, thanks for your feedback. This is going the way I am hoping it will go, seeking at least some degree of confidence in AutoBorne Sealers as the standard primer of choice, regardless of what paint brand will go on it later on.

Thanks again :thumbsup:
 
Createx are pretty open about saying that they’re paints are compatible with most water based systems. I don’t think you’ll have any problems using other manufacturers products. I’m pretty sure I spoke to somebody who uses urethane paints over the cured AutoBorne sealer. I can’t remember the exact conversation though. Sent from my iPhone using Tapatalk

Hi @SiRoxx,

Thanks for that. Well, I wrote to Createx this past week, raising the question and asking for some feedback.

My gut-feeling is that they will be alright, but I want to be sure. If it turns out AutoBorne is completely safe to paint on with other acrylic (ie water based) paint brands, I think I will stick with it as the standard primer to-go-for. Again, in modelling and rigid substrates.

I have no concerns about enamel and oil paints. High VOC solvent content paints are fully compatible with acrylic primers, because they do not share chemical interference issues with acrylic resins. I have never found any issues in 25-30 years, not even with oil-modified alkyd resin oil paints painted over acrylic primers and/or gessoes. Flexible or rigid substrates, it is an established fact.

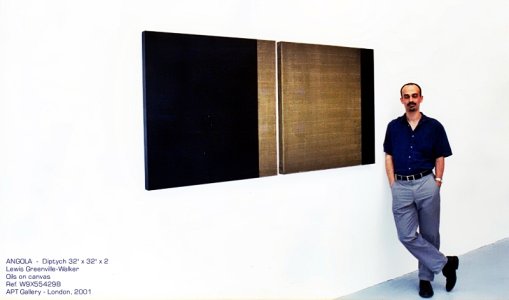
The painting below is 20 years old. It is a diptych 32x32 inches sq. (x2), 385gsm cotton duck stretched on kiln-dried hardwood frames, studio finish. The canvas was primed with Lascaux Acrylic Gesso, sanded down, vacuumed and re-primed with Lascaux Acrylic Primer, both at a 5% dilution ratio. It was left to cure for 5 days and the surface then polished with a damp non-scratch scourer sponge (white ones used for cleaning chrome plated metals). Dust was vacuumed. Then the painting was executed with Old Holland Oils mixed with an alkyd medium, the raised texture is Old Holland Oils mixed with Lukas Alkyd Painting Butter Medium No. 5. I haven't seen it in 20 years, but others in the same series, painted in the same year haven't failed.

The principle is the same, in Fine Art, modelling, illustration, etc... High VOC solvent oils and enamels are stable over acrylics, the risk of cracking is much lower as well, because acrylics are not hygroscopic, so the substrate will not swell and push up into the enamel/oil paint film.

Thus, the point here for me, is any acrylic paint of any brand, over the AutoBorne primer. :D

Angola Diptych 32inx2 2001-London.jpg
 
Hi @SiRoxx,

Thanks for that. Well, I wrote to Createx this past week, raising the question and asking for some feedback.

My gut-feeling is that they will be alright, but I want to be sure. If it turns out AutoBorne is completely safe to paint on with other acrylic (ie water based) paint brands, I think I will stick with it as the standard primer to-go-for. Again, in modelling and rigid substrates.

I have no concerns about enamel and oil paints. High VOC solvent content paints are fully compatible with acrylic primers, because they do not share chemical interference issues with acrylic resins. I have never found any issues in 25-30 years, not even with oil-modified alkyd resin oil paints painted over acrylic primers and/or gessoes. Flexible or rigid substrates, it is an established fact.

The painting below is 20 years old. It is a diptych 32x32 inches sq. (x2), 385gsm cotton duck stretched on kiln-dried hardwood frames, studio finish. The canvas was primed with Lascaux Acrylic Gesso, sanded down, vacuumed and re-primed with Lascaux Acrylic Primer, both at a 5% dilution ratio. It was left to cure for 5 days and the surface then polished with a damp non-scratch scourer sponge (white ones used for cleaning chrome plated metals). Dust was vacuumed. Then the painting was executed with Old Holland Oils mixed with an alkyd medium, the raised texture is Old Holland Oils mixed with Lukas Alkyd Painting Butter Medium No. 5. I haven't seen it in 20 years, but others in the same series, painted in the same year haven't failed.

The principle is the same, in Fine Art, modelling, illustration, etc... High VOC solvent oils and enamels are stable over acrylics, the risk of cracking is much lower as well, because acrylics are not hygroscopic, so the substrate will not swell and push up into the enamel/oil paint film.

Thus, the point here for me, is any acrylic paint of any brand, over the AutoBorne primer. :D

I think that all sounds like a smart approach Buddy. It’s good to ask first and experiment later. I’m with you in the gut feeling. They are a great product. I’ve used the sealers through a spray gun a few times and they self level really well.


Sent from my iPhone using Tapatalk
 
Make sure its fully cured, that's what the experts usually say.

Very little experience using the sealers myself but what I have had has been ok using other brands on top.

Lee
 
REPLY EMAIL FROM CREATEX TECHNICAL SUPPORT:

Createx Tech Support (techsupport@createxcolors.com)
Tue, 3 Aug, 15:25 (1 day ago)
to me


Hello Lewis Greenville-Walker,

Thank you for contacting Createx Colours.

AutoBorne Sealer can be used as the initial sealer-primer coating for paints other than Createx paints.

With most other paint types, scuffing is not required, however you should test each paint type to ensure adhesion is as optimal when applied over AutoBorne Sealer without scuffing as opposed to dry-sanding AutoBorne Sealer with 600-800 grit sandpaper prior to applying paint.

If in doubt, scuff AutoBorne Sealer prior to applying the paint. [1]

If we may be of further service, please let us know.

Best Regards,
Technical Support
Createx Colours

www.creatextech.com

[1] Though Createx Technical Support does not explicitly mention, scuffing their AutoBorne Primers/Sealers must only be performed after they are fully cured, which may take up to 48 hours.
 
Last edited:
Make sure it's fully cured, that's what the experts usually say. Very little experience using the sealers myself but what I have had has been ok using other brands on top. Lee

Hi Lee (@jord001),

It is never too much to mention that scuffing (or fine dry-sanding) must only be done after the primer is fully cured. Typical curing times for acrylics and acrylic urethanes are between 36 and 48 hours. :)

Using hot air (hair-drier or heat gun) doesn't help curing any faster and weakens the paint film. Proper curing should be left to run its course for up to two days at room temperature.

It's a good thing that you insist on this specific point, because it really is a critical one.:thumbsup:
Never force dry anything . It cures the outer layer first while the underneath is still soft
 
Createx drying, for when working with it, can be sped up with air only (if you need to). No heat. You can see it dry. That is enough for you to continue layering. if you use heat, it dries a skin that will not let the still wet paint under it "gas off" (for a better term).
Curing (when paint is 100% dry) is very quick. They say that you can clear after an hour, but I always wait at least 1 day. That is if everything is done correctly. You can't load the paint on and expect the same result....What is nice, is that there is no time window. You can clear 6 months down the line if you want to....lol
When I use the sealers, I can air blow dry it and it is ready to go. If I want to dry sand it to get rid of bumps and crap, I wait less than an hour. I have sanded it as soon as 15 mins. I have all the base sealers. Black, white, silver and trans. I have yet to use the clear sealer yet. I sometimes tint it toward the base color.
Since i have been using it, My adhesion worries and problems almost disappeared...
Cheers
 
Createx drying, for when working with it, can be sped up with air only (if you need to). No heat. You can see it dry. That is enough for you to continue layering. if you use heat, it dries a skin that will not let the still wet paint under it "gas off" (for a better term). Curing (when paint is 100% dry) is very quick. They say that you can clear after an hour, but I always wait at least 1 day. That is if everything is done correctly. You can't load the paint on and expect the same result....What is nice, is that there is no time window. You can clear 6 months down the line if you want to....lol When I use the sealers, I can air blow dry it and it is ready to go. If I want to dry sand it to get rid of bumps and crap, I wait less than an hour. I have sanded it as soon as 15 mins. I have all the base sealers. Black, white, silver and trans. I have yet to use the clear sealer yet. I sometimes tint it toward the base colour. Since I have been using it, My adhesion worries and problems almost disappeared...
Cheers

Hi @twood, I am surprised you manage to dry-sand Createx AutoBorne Sealers/Primers within an hour with good results. You're brave. :thumbsup:

I wouldn't dare and advise 24 to 48 hours curing time, or at the least overnight at room temperature in room that's not stone cold overnight, especially in Winter. But geographical location may factor into this. I am in North East England, which is humid much of the year, so it is possible that I can't get the results you get, because of air humidity.

Having said that, I do not usually dry-sand primers... I have an unusual method, which is actually inherited from an altogether different practice (traditional gilding and reproduction or antique furniture varnish with Polyvine Wax Finish Varnish, prior to wax-polish. I use this method also after I varnish a final coat on a model, wherever it is possible to do this; obviously on intricate models with very small detail parts, it is not practical.

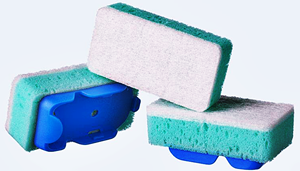
I use those non-scratch white-scourer sponges, designed to clean chrome fittings, like taps and such (see below). Once the coating is dry and fully cured, it is rubbed with the white scouring side of the sponge. It works really well, because it is abrasive without deep-scratching, resulting in the following:
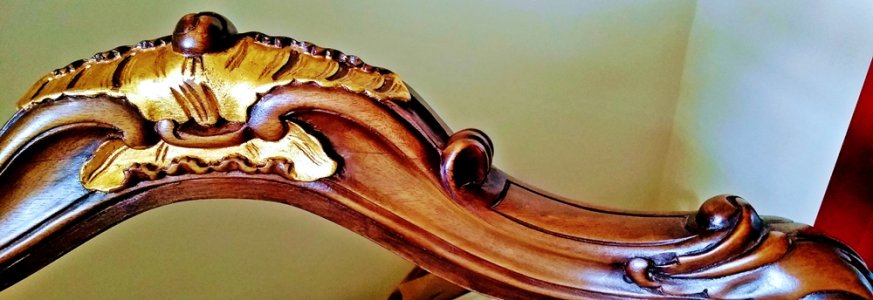
  1. On traditional water or oil gilding, the white scourer flattens the lacquer to an exceptionally smooth surface, lifting just slightly enough gold to reveal the red "bole" underneath, just a little. I vacuum and then apply microcrystalline wax and polish.
  2. On classic furniture finishes, white-scouring flattens the Polyvine finish. Rubbing in this way until the surface feels warm to the touch, leaves the piece with a very smooth surface, ready for a light waxing and polish.
  3. On acrylic primers, it scuffs microscopically the surface, and at the same time leaves it smooth to accept a finish top coat of paint. This is useful in modelling especially, because styrenes are fragile and fairly soft plastics, so this method scuffs without damage to tiny details, such as rivets, for example.
  4. On acrylic gessoes and primers applied to wooden and MDF panels, stretched or marouflage'd canvasses; white-scouring flattens the primer or gesso, killing off fabric raised fibres (they feel spiky to the finger-touch and should always be taken off), leaving the surface with a keyed but smooth surface to paint on.
I do not have photos of everything as above, but leave here a couple of them just as an example:

IMG_20210805_141821450.jpg
Non-Scratch Washing-Up Pads Spontex.png
 
Hi @twood, I am surprised you manage to dry-sand Createx AutoBorne Sealers/Primers within an hour with good results. You're brave. :thumbsup:

I wouldn't dare and advise 24 to 48 hours curing time, or at the least overnight at room temperature in room that's not stone cold overnight, especially in Winter. But geographical location may factor into this. I am in North East England, which is humid much of the year, so it is possible that I can't get the results you get, because of air humidity.

Having said that, I do not usually dry-sand primers... I have an unusual method, which is actually inherited from an altogether different practice (traditional gilding and reproduction or antique furniture varnish with Polyvine Wax Finish Varnish, prior to wax-polish. I use this method also after I varnish a final coat on a model, wherever it is possible to do this; obviously on intricate models with very small detail parts, it is not practical.

I use those non-scratch white-scourer sponges, designed to clean chrome fittings, like taps and such (see below). Once the coating is dry and fully cured, it is rubbed with the white scouring side of the sponge. It works really well, because it is abrasive without deep-scratching, resulting in the following:
  1. On traditional water or oil gilding, the white scourer flattens the lacquer to an exceptionally smooth surface, lifting just slightly enough gold to reveal the red "bole" underneath, just a little. I vacuum and then apply microcrystalline wax and polish.
  2. On classic furniture finishes, white-scouring flattens the Polyvine finish. Rubbing in this way until the surface feels warm to the touch, leaves the piece with a very smooth surface, ready for a light waxing and polish.
  3. On acrylic primers, it scuffs microscopically the surface, and at the same time leaves it smooth to accept a finish top coat of paint. This is useful in modelling especially, because styrenes are fragile and fairly soft plastics, so this method scuffs without damage to tiny details, such as rivets, for example.
  4. On acrylic gessoes and primers applied to wooden and MDF panels, stretched or marouflage'd canvasses; white-scouring flattens the primer or gesso, killing off fabric raised fibres (they feel spiky to the finger-touch and should always be taken off), leaving the surface with a keyed but smooth surface to paint on.
I do not have photos of everything as above, but leave here a couple of them just as an example:

That is not being brave. It is just using a product properly. There is no mystery. In this video, that I posted below, he sanded after an hour and a half after 3 coats and his last coat was a flood coat. This was even 7 years ago and they have improved the sealers since then. I have mentioned this already, that airbrushing is a separate beast in itself, so conventional oils and brush painting, products used in such does not always relate to airbrushing. If you use the products properly it is as stated....
I can give you my own experiences with sealers. I airbrush plastic Christmas ornaments and always prime using the sealers. I can sand them in half an hour no problem. I base a lot of these in black and they need to be as smooth as possible or the clear will accent any flaws when done....
The only way to find out is to try it yourself. Like yourself, I used to over analyze everything. I just jumped in with both feet and did it and found out for myself. Sometimes you create your own issues, but the experience in doing so is invaluable.
Cheers

View attachment 65930
View attachment 65931
 
That is not being brave. It is just using a product properly. There is no mystery. In this video, that I posted below, he sanded after an hour and a half after 3 coats and his last coat was a flood coat. This was even 7 years ago and they have improved the sealers since then. I have mentioned this already, that airbrushing is a separate beast in itself, so conventional oils and brush painting, products used in such does not always relate to airbrushing. If you use the products properly it is as stated....
I can give you my own experiences with sealers. I airbrush plastic Christmas ornaments and always prime using the sealers. I can sand them in half an hour no problem. I base a lot of these in black and they need to be as smooth as possible or the clear will accent any flaws when done....
The only way to find out is to try it yourself. Like yourself, I used to over analyze everything. I just jumped in with both feet and did it and found out for myself. Sometimes you create your own issues, but the experience in doing so is invaluable.
Cheers


Edit...I do not know why my reply did not show on the above post....
 
That is not being brave. It is just using a product properly. There is no mystery. In this video, that I posted below, he sanded after an hour and a half after 3 coats and his last coat was a flood coat. This was even 7 years ago and they have improved the sealers since then. I have mentioned this already, that airbrushing is a separate beast in itself, so conventional oils and brush painting, products used in such does not always relate to airbrushing. If you use the products properly it is as stated....
I can give you my own experiences with sealers. I airbrush plastic Christmas ornaments and always prime using the sealers. I can sand them in half an hour no problem. I base a lot of these in black and they need to be as smooth as possible or the clear will accent any flaws when done....
The only way to find out is to try it yourself. Like yourself, I used to over analyze everything. I just jumped in with both feet and did it and found out for myself. Sometimes you create your own issues, but the experience in doing so is invaluable. Cheers
Edit...I do not know why my reply did not show on the above post....

Hi @twood thanks for the video and comments. I watched it from start to finish.

I tried it myself, which is how I arrived at the conclusions I shared earlier. The skillset is transferable between airbrush and traditional painters (oils or otherwise), because both will use acrylic gessoes or primers in most cases. Not many oil painters still prime in flat oil primers these days. Many oil painters will use a spray gun or an airbrush to apply the acrylic primer.

In the video, the painter is using 500 grit to dry-sand, followed by grey scotch pad. The sanding may be okay for the purposes of priming metal (although the flaw that develops on the paint film mid-video might suggest otherwise, probably caused by a too aggressive dry sanding?).

In modelling (on styrene) and artwork on paper, canvas, wooden/MDF panel, etc, the method in the video is likely to be unsuitable. Grit can't be 500, it needs to be finer, 800/1000/1500 grit. Or a white scourer sponge, to avoid an accidental blemish such as the one seen in the video. I can be pretty assertive with a white scourer sponge, it will flatten the primer, remove all the excessive roughness and leave the surface nice and smooth but with enough key.

It is safe enough on art papers, linen, cotton and synthetic canvas, etc. On canvas/fabrics, white scourer doesn't scuff the upper threads in the weave. The same applies to 800/1000 grit and above, if dry sanding is preferred.

I can't replicate the drying method shown in the video. It doesn't work for me. This is why I make a distinction between drying and curing; it's because if I tried to dry-sand (or like I said, white scourer rubbing) in 90 minutes or so, the primer will not scuff to fine dust. I have to leave the primer rest to fully cure hard through, at least overnight or no less than 24 hours. Then I am able to scuff to fine dust.

This is not to say my method is correct and the method you illustrated is not... I think the method shown in the video probably works just fine under the conditions shown in the video. It's a metal substrate. AutoBorne primers on paper, canvas and modelling do not replicate the result in the video, in my experience. :)
 
Back
Top