You are using an out of date browser. It may not display this or other websites correctly.
You should upgrade or use an alternative browser.
You should upgrade or use an alternative browser.
Homemade (with tender loving care) Airbrush
- Thread starter DaveG
- Start date
DaveG
Airbush Analyst
Almost there! What do you intend to use as a handle?
I haven't really decided, yet. It will have the same period flavor as the rest of the build, but exactly what, I don't know yet.
DaveG
Airbush Analyst
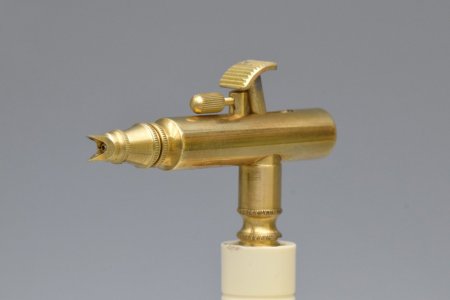
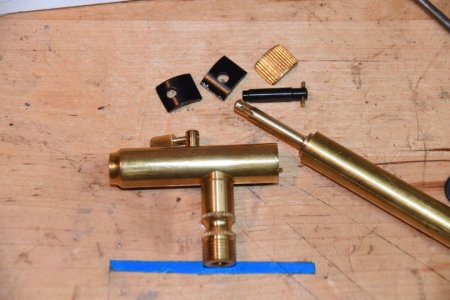
After a few trials and many errors, I got a trigger fit to this build. The odds are that I will replace this one with a flat top button (to reduce the overall height) and fit this style trigger to a new body with no trigger stop in front (to allow for a lower build). I did several prototypes from plastic (Delrin), as it was easy to machine, could be bonded with crazy glue, and allowed me to find measurements that would work for a finished piece.


Electric Cat Dude
Needle-chuck Ninja
After a few trials and many errors, I got a trigger fit to this build. The odds are that I will replace this one with a flat top button (to reduce the overall height) and fit this style trigger to a new body with no trigger stop in front (to allow for a lower build). I did several prototypes from plastic (Delrin), as it was easy to machine, could be bonded with crazy glue, and allowed me to find measurements that would work for a finished piece.
View attachment 67337 View attachment 67338
it definitely shows inspiration from the old Thayer & Chandler model AAs.
By the way in re the screw on the trigger. I saw that is very common with traditional Badger and Thayer & Chandler air brushes. Even whole bind use that on some of their Toricon airbrushes. Was that intended for fine lion control, or was it designed for preventing the needle from being seated into the nozzle during long-term storage?
Last edited:
DaveG
Airbush Analyst
it definitely shows inspiration from the old Thayer & Chandler model AAs.
By the way in re the screw on the trigger. I saw that is very common with traditional Badger and Thayer & Chandler air brushes. Even whole bind use that on some of their Toricon airbrushes. Was that intended for fine lion control, or was it designed for preventing the needle from being seated into the nozzle during long-term storage?
Badger airbrush answered a question about that screw saying it was there to hold the needle back during shipping and storage. OC Wold, who first patent the design in the late 1890's referred to it as a "trigger stop" described as being used for fine line control. Both Wold and Thayer Chandler direct the user to adjust the screw to set line width in their instructional materials, but make no mention of using it to keep the needle back during storage or handling. The Thayer Chandler was designed in large part by OC. Wold, who was a foreman at the company (TC) while also starting the Wold Airbrush Company. The first Badgers (mid-1960's) were original production of Thayer Chandler Model A's after TC made a design change, altering the body shape on the TC Model A. The first Badger bodies had no branding (other than a sticker) and also featured the same adjustable regulator heads of the TC model A. I think there was less than 3 or 4 areas of the brush that changed when Badger took over the original TC build. Little things, like internal air valve specs, trigger post, and springs being used... Oh, and Badger pressed in a teflon needle bearing from the front of the brush, while TC never did.
My build is heavily influenced by OC Wold, and some of his early design(s). Specs vary, as I am trying to incorporate some of the more modern (post 1960's) evolution developed in Japanese airbrush design. Cosmetically it should have one flavor, while function wise it should have another.
Last edited:
Vladimir
Detail Decepticon!
When I first saw your design, my thought was then "why did he make the AB body with trigger position regulator"
I think, it never makes any conveniences for freehand airbrushing. Besides, it limits the trigger designs, actually, you've come to this point.
I never planned to make that limiter on the body
Waiting for your next steps, Dave!
I think, it never makes any conveniences for freehand airbrushing. Besides, it limits the trigger designs, actually, you've come to this point.
I never planned to make that limiter on the body
Waiting for your next steps, Dave!
DaveG
Airbush Analyst
I actually use the ones that work from in front of the trigger, like the TC, Wold, Neo Hohmi, Paasche, and even the Aerograph type pre-sets much more than the ones that work by stopping needle travel at the back (I generally don't use those at all). Not so much for line width, but more for working with creating textures. But, to each his own. Everyone works in a way that works best for them.When I first saw your design, my thought was then "why did he make the AB body with trigger position regulator"
I think, it never makes any conveniences for freehand airbrushing. Besides, it limits the trigger designs, actually, you've come to this point.
I never planned to make that limiter on the body
Waiting for your next steps, Dave!
Vladimir
Detail Decepticon!
I actually use the ones that work from in front of the trigger, like the TC, Wold, Neo Hohmi, Paasche, and even the Aerograph type pre-sets much more than the ones that work by stopping needle travel at the back (I generally don't use those at all). Not so much for line width, but more for working with creating textures. But, to each his own. Everyone works in a way that works best for them.
I'm with you, I don't use also that back travel limiter.
But those in front don't allow me to paint as I want.
That's good, people have their own preferable ways of work, making tools due to their vision
DaveG
Airbush Analyst
I'm with you, I don't use also that back travel limiter.
But those in front don't allow me to paint as I want.
That's good, people have their own preferable ways of work, making tools due to their visionGood is, different AB designs might be born, or not, time will show

When I am doing textures such as found in the bone structure of this skull - I like to use the front located trigger stops to hold the needle back a little, and then use the trigger to tickle the air on (and off), without mashing it all the way down. The stops that are located up front still allow the user to clear the needle tip quickly by drawing the needle back and giving a good blast - off to the side, then returning to the stop, and back to work... The ones that stop the needle from being drawn back, will start to clog with tip dry the moment you start painting. It is also not very easy to clear the needle tip without adjusting the stop.


A. Andrew Gonzalez
Double Actioner
When I am doing textures such as found in the bone structure of this skull - I like to use the front located trigger stops to hold the needle back a little, and then use the trigger to tickle the air on (and off), without mashing it all the way down. The stops that are located up front still allow the user to clear the needle tip quickly by drawing the needle back and giving a good blast - off to the side, then returning to the stop, and back to work... The ones that stop the needle from being drawn back, will start to clog with tip dry the moment you start painting. It is also not very easy to clear the needle tip without adjusting the stop.
This is exactly why I prefer the front trigger/needle adjustment on my Paasche VJR -V1
I'm able to do something similar with my Custom Micron SB. I put a small rubber 0-ring (anything with the right fit will work) between the Needle Spring Adjuster and the Needle Chuck Nut. Insert needle, tighten nut, adjust the spring adjuster to push back the needle chuck nut to the finest line spray then put back the handle and ready to go.
DaveG
Airbush Analyst
This is exactly why I prefer the front trigger/needle adjustment on my Paasche VJR -V1
I'm able to do something similar with my Custom Micron SB. I put a small rubber 0-ring (anything with the right fit will work) between the Needle Spring Adjuster and the Needle Chuck Nut. Insert needle, tighten nut, adjust the spring adjuster to push back the needle chuck nut to the finest line spray then put back the handle and ready to go.
David Naylor has been working on a trigger design that moves the needle back a tiny bit as the trigger is being depressed for air. The setup is amazing for working very small details. I think he is currently producing small quantities by hand, but holds a patent for the design. If he gets them mass produced, it could be a game changer if added to a production brush.
jord001
Air-Valve Autobot!
What a great read, but saying that anything that you machine Dave doesnt surprise me. You talked me through some tech stuff when I was making tools and parts for my old airbrushes. I still have plans for a couple of the airbrushes but not got the tools yet. Seeing the nozzle setups is my interest as they are the challenge I have.
DaveG
Airbush Analyst
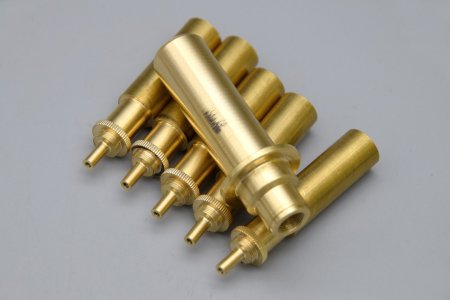
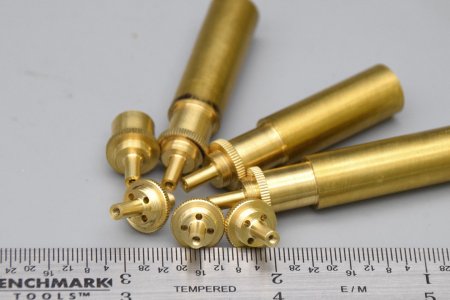
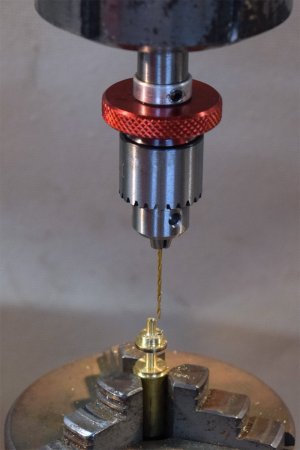
Well, that was a challenge - After many attempts I finally sorted out making the head base in a way that is repeatable, rather than doing a single one-off and hoping for the best. I had to work out the sequence of steps including turning, threading, drilling, and knurling while moving back and forth between machines and holding fixtures while also maintaining concentricity and dimensional accuracy to some silly small tolerances. I wound up spending more time working on the holding fixtures and machines than cutting parts in order to get everything where it needed to be to produce the parts at the level I was searching for. I had many, many failures along the way. I would end the day turning the lights off in the shop wondering if I could do it, only to walk back in in the morning determined to find solutions. In the end, I am thrilled with the results I was able to achieve on these head bases. Having measured scores of factory parts, I know that these would be right at home with them in terms of allowable +/- specs without issue.


Vladimir
Detail Decepticon!
That's cool, Dave!
How these things are familiar to me!
Why don't you use spring collet chucks for the dividing head and drilling also? I even plan to change one drill press shaft for holding spring collet chuck. With the dividing head the things are much easier to change the chucks.
How these things are familiar to me!
Why don't you use spring collet chucks for the dividing head and drilling also? I even plan to change one drill press shaft for holding spring collet chuck. With the dividing head the things are much easier to change the chucks.
DaveG
Airbush Analyst
I have two ER32 collet chucks. The best I can get the pair of them to do is @0.0015" (one has less runout than the other). The repeatability between the pair is fine for general turning of most projects, but too far out for me to feel comfortable using them here. The three jaw I have on my rotary table has had the jaws cut and ground to run true. I've worked on the rotary table itself with a bit of careful machining and have the pair rotating on center to within a runout that is basically 0. I am using a 4 jaw independent to dial in center on the lathe.That's cool, Dave!
How these things are familiar to me!
Why don't you use spring collet chucks for the dividing head and drilling also? I even plan to change one drill press shaft for holding spring collet chuck. With the dividing head the things are much easier to change the chucks.
Vladimir
Detail Decepticon!
I have two ER32 collet chucks. The best I can get the pair of them to do is @0.0015" (one has less runout than the other).
Four microns it is not that bad runout. Especially if to think how mass production airbrushes are made, I mean their final "runout".
Though, spring collets bring more surprises when you try to check the runout of the perfectly ground part installed. So chuck runout and spring collet runout may bring thought "I'd better use ground 3 jaw chuck"
Good spring collets = high price.
I've worked on the rotary table itself with a bit of careful machining and have the pair rotating on center to within a runout that is basically 0. I am using a 4 jaw independent to dial in center on the lathe.
Definitely!
The three jaw I have on my rotary table has had the jaws cut and ground to run true.
Cool! How did you do that? Maybe you know some good video on the subject on you tube?
I know how to "zero" lathe chuck and drill chuck (key tightening type). But never had to think over centering rotary table/dividing head chucks as my mill is still in factory seal grease.
DaveG
Airbush Analyst
I have an indexing head, as well as a 5c spin indexer and a few small rotary tables. Working vertical, I use the rotary table with dividing plates. The setups I wind up using are not always the most logical in an ideal world, but I go off of the results I get vs. what "should" be best  .
.
I will search for a video on the chuck truing. Basically you place material between the jaws (on the angles, not the center) while closing it, so it is under clamping force, then bore the jaws. Hone afterwards to smooth the jaw faces while still under clamping pressure. I believe it was a Southbend tech that posted a video, but will have to search to be certain.
Yes, it is the collets that I have been having difficulty in getting good, repeatable results from - and I can't afford to keep throwing money at them. Cheaper to use a 4 jaw, and spend the time dialing it in...
Similar threads
- Replies
- 31
- Views
- 1K
