Homemade (with tender loving care) Airbrush

These recent pieces are looking amazing Buddy. Your .2 conversion may have just tipped me over the edge to pick up an Eclipse Takumi


Sent from my iPhone using Tapatalk

I have a .18 Eclipse Takumi setup running. I made a .2 nozzle cap this morning, but ruined it while trying to get a needle cap to screw on all the way... bit(h turned out to be a buggered needle cap, too... so, need to cut another. It did seem to work well...

This is a .18 Eclipse Takumi
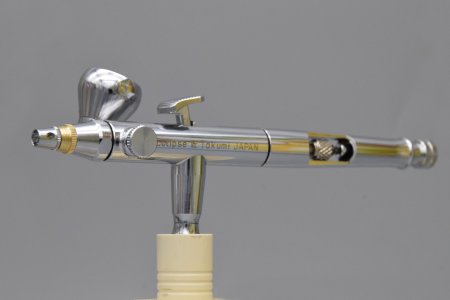
18 Eclipse SBS-1.jpg
 
Last edited:
I saw the .18 which looks incredible. I love the idea as I’m such a fan of my bog standard eclipse. I’d absolutely love to try it with some smaller setups.


Sent from my iPhone using Tapatalk
 
I made a one-off head that fits a Micron body for some testing -

You've done exactly what I mentioned above:thumbsup:
Dave, when are you going to do some testing? It's really interesting how that amount of holes improve the characteristics. Can't do that myself as the equipment is not ready to work yet.

I know who's going to hate ya for this head!:D

I have a .18 Eclipse Takumi setup running.

Cool! What about the centering of it all in the end you got?

I had an idea to make head for this series of ABs;)

And I must somehow buy this Takumi for experimenting, as I like Eclipse body feel while working, it's much better than other models to me.

BTW, looked at your needle protection design. It adds that vintage feel of the first Wold models, like it!
 
You've done exactly what I mentioned above:thumbsup:
Dave, when are you going to do some testing? It's really interesting how that amount of holes improve the characteristics. Can't do that myself as the equipment is not ready to work yet.

I know who's going to hate ya for this head!:D


Cool! What about the centering of it all in the end you got?

I had an idea to make head for this series of ABs;)

And I must somehow buy this Takumi for experimenting, as I like Eclipse body feel while working, it's much better than other models to me.

BTW, looked at your needle protection design. It adds that vintage feel of the first Wold models, like it!

I have tried the Micron head on a brush using the stock nozzle cap. It works as one would expect. The one thing I did notice almost immediately was that I could turn the air pressure up quite a bit without experiencing spidering, or spreading of paint when doing fine lines or details as readily as with the stock head base. Line edges appear to be smoother, or cleaner in appearance. Kind of like an Iwata Micron line vs. and Olympos Micron line (if you have ever compared). I just used the brush long enough to get an impression, but will return to it when I have made a revised nozzle cap for my head base.

On the Eclipse nozzle caps, I just machined everything concentric and kept my fingers crossed while screwing the cap on very slowly. When snugged down, alignment appears to be spot on. I have moved the .18 parts to the Eclipse Takumi, and made a .2 set up for the BS. On both of these, what I see in addition to the small stuff, is that atomization seems to be very fine. The spray pattern looks noticeably smoother from center out as compared to the .35 setup which can look grainy in comparison. I am early in testing, using just one paint sample so far (Etac with conditionair added).
 
I have tried the Micron head on a brush using the stock nozzle cap. It works as one would expect. The one thing I did notice almost immediately was that I could turn the air pressure up quite a bit without experiencing spidering, or spreading of paint when doing fine lines or details as readily as with the stock head base. Line edges appear to be smoother, or cleaner in appearance. Kind of like an Iwata Micron line vs. and Olympos Micron line (if you have ever compared). I just used the brush long enough to get an impression, but will return to it when I have made a revised nozzle cap for my head base.

The results show that it's right way to think about the improvements.
Nozzle cap of the present original design spoils all the concept of fine detail airbrush. I think you've already come to right decision what to change;)

On the Eclipse nozzle caps, I just machined everything concentric and kept my fingers crossed while screwing the cap on very slowly. When snugged down, alignment appears to be spot on. I have moved the .18 parts to the Eclipse Takumi, and made a .2 set up for the BS. On both of these, what I see in addition to the small stuff, is that atomization seems to be very fine. The spray pattern looks noticeably smoother from center out as compared to the .35 setup which can look grainy in comparison. I am early in testing, using just one paint sample so far (Etac with conditionair added).

Have you done your nozzle base? I have an old base that allows unscrewing the nozzle, but never had an idea to try there .18 as it's useless without the air cap.
You're lucky, that the alignment is good. There are many factors that can make that wrong.
 
The Eclipse .35 nozzle is a "normal" nozzle screwed into a brass carrier. The threads are the same as the original nozzles, like the micron and HP series... the .18 nozzle screwed right in (as did a .2). The .5 nozzles are a one piece brass deal. The exit bore on the .35 is on the large side, even for a .3 - so, a new cap for smaller nozzles is for sure a necessity. I am playing as much with the internal shape(s) as I am with anything else.
 
I took a break from working on this scratch built brush while spending some time researching an learning. I made several complete head assemblies for another project. The heads use Richpen Phoenix (0.2mm) nozzles, custom ground needles, and feature my own internal specs that are neither Wold, nor Richpen. It was an easy decision to mount one of the heads on this build once I saw out how well they worked in testing. I completed the internals that are also a good blend of ideas from both Wold and Richpen.

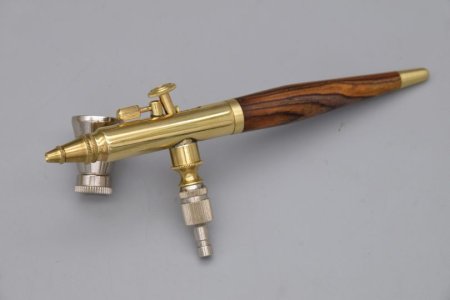
Here is the brush in its current state - 1st photo in raw brass with a Cocobolo handle (no finish applied yet). It is working, and is currently completely usable.

scratch made-1.jpg
 
This is a beautiful brush to see Dave. It is pretty but it is the painstaking love that you poured into making it that is the true beauty of it to me.

Bravo sir. There aren't enough adjectives for me to describe how wonderful your workmanship is on it.

Seeing this brush does bring a huge smile to my face.
 
Looks gorgeous in raw brass!
O.C. Wold and Charles Burdick is smiling.
Will you be selling signed copies? :)
And that kids, is how is done. Class dismissed.

giphy.gif
 
What to do when you run out of money, and can't seem to find any interesting brushes to add to your collection?
Make your own, of course!
I started working on building a custom brush. I am using an Iwata 0.2mm nozzle and needle, but the rest is/will be scratch made. I am about half way there as far as making all the parts. Perhaps just a few days away from being able to at least test it, though. Fingers crossed I did my math right!

Main body, and air valve -
View attachment 67309 View attachment 67310 View attachment 67311 View attachment 67312 View attachment 67313 View attachment 67314 View attachment 67315
Your airbrush looks great 😍 Dave! I really like your sketch/schematics for its plan. I like the little cap on top of the main body. I can't imagine how long this must have taken you since the concept, but it's looking really good! Thank you for sharing the progress of your original creation! 🙏
 
Your airbrush looks great 😍 Dave! I really like your sketch/schematics for its plan. I like the little cap on top of the main body. I can't imagine how long this must have taken you since the concept, but it's looking really good! Thank you for sharing the progress of your original creation! 🙏
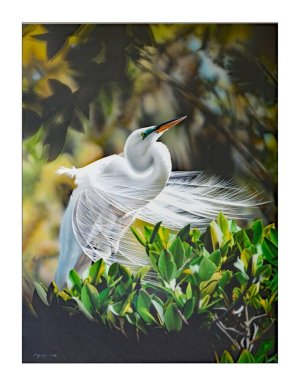
ThanK you, Lisa. My deal is that I love to paint (I don't get to do it anywhere near as often as I would really like). I also love a good airbrush, and I like history... The craftsmanship that went into manufacturing in the early part of the 20th century is truly stunning stuff. What I enjoy most of all is knowing that I can walk into my studio and choose any brush in my collection, and sit down to do a days work without having to ever wonder if the brush is up to the task. I do what i do so that I can keep them in working order.

egret 1989 1.jpg
 
ThanK you, Lisa. My deal is that I love to paint (I don't get to do it anywhere near as often as I would really like). I also love a good airbrush, and I like history... The craftsmanship that went into manufacturing in the early part of the 20th century is truly stunning stuff. What I enjoy most of all is knowing that I can walk into my studio and choose any brush in my collection, and sit down to do a days work without having to ever wonder if the brush is up to the task. I do what i do so that I can keep them in working order.

View attachment 86289
Simply amazing! 🤩 You are multitalented! It’s great that one of your skill helps the other as in this case, it is why you’re able to easily attend to your craft without doubting any of your tools (airbrushes) as you’ve said! 👏
I think a lot of us here can relate with the struggles of time for our art creation 😔 . But it’s good that we still do our best to make it work 😅!
Since I’m not too technically/mechanically inclined, (plus I don’t have the tools), I don’t work in-depth on my collection as you do…but it gives me a good excuse to leave them as they are 😁 Of course I do like to attend to their cleaning, and restoration, so they can be better preserved. 😌 😁🙏
 
I took a break from working on this scratch built brush while spending some time researching an learning. I made several complete head assemblies for another project. The heads use Richpen Phoenix (0.2mm) nozzles, custom ground needles, and feature my own internal specs that are neither Wold, nor Richpen. It was an easy decision to mount one of the heads on this build once I saw out how well they worked in testing. I completed the internals that are also a good blend of ideas from both Wold and Richpen.

Here is the brush in its current state - 1st photo in raw brass with a Cocobolo handle (no finish applied yet). It is working, and is currently completely usable.

View attachment 86286
This looks incredible Dave. Absolutely beautiful work.
 
it is a piece of art for sure and I bet it works just perfect I am only surprised you didnt go for the 2 sprong needle guard I know you made one for this airbrush in the early stages
 
it is a piece of art for sure and I bet it works just perfect I am only surprised you didnt go for the 2 sprong needle guard I know you made one for this airbrush in the early stages
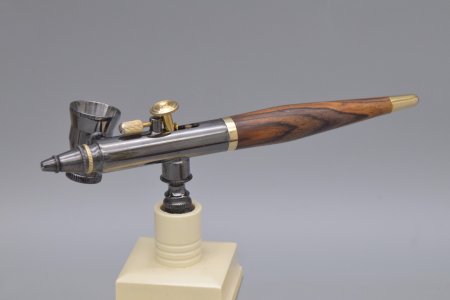
I chose an adjustable regulator setup for this brush. It offers more flexibility than the first head design I had on the brush. You can do anything from a super fine detail line, smooth gradations to heavy stippling simply by adjusting the front nozzle cap(regulator). The length of the cap is such that it can be touched to the surface to get the finest of details, while still just protecting the needle tip.
 
Damn, I didn't think it could look any better and then you throw black chrome at us!! That's stunning Dave, You must be so pleased at how it turned out :)
 
Back
Top