I learned a lesson today...

@Kim McCann,

Thank you very much for that sage advice. When I broke the 0.3mm nozzle, I was screwing it in with the wrench so as a noob, I have learned my lesson. So, now I know that they are extremely delicate and how to install them. I also have learned that a 0.3mm nozzle is more than adequate for my needs. I was trying out the 0.2mm nozzle beforehand and decided to go back to the 0.3 nozzle when I broke it.

Like I said before, this is a cheap Chinese airbrush that does resemble the Master Airbrush economy models so maybe I will someday buy a replacement nozzle for it. The kit I bought came with three needles, two nozzles and a 0.5mm nozzle cap with no 0.5mm nozzle. So, I can't even use the 0.5mm needle at all. I contacted the ebay seller about this and I am waiting for a reply.

Meanwhile, I am taking in all of the information and suggestions that have been so graciously provided for me here.
If you broke off the nozzle threads leaving them in the body there are a few ways to remove them without special tools. A bamboo BBQ skewer pushed in with some force can be used to unwind the broken part and free it from the body. Wood toothpicks are usually too soft and break, but bamboo often does the trick.

Also with care, a number 11 exacto blade can be pushed in until the edge catches the soft metal of the remaining nozzle piece and can be then used to unscrew it from the body.

Be careful to only let the blade side bite the nozzle remanants. Not the threads in the body. A magnifying glass works.

Be slow and patient. It can take quite a few tries.

Sent from my SM-N981W using Tapatalk
 
If you broke off the nozzle threads leaving them in the body there are a few ways to remove them without special tools. A bamboo BBQ skewer pushed in with some force can be used to unwind the broken part and free it from the body. Wood toothpicks are usually too soft and break, but bamboo often does the trick.
Thank you for the advice. I had already removed the threads using a toothpick. They came out very easy.
 
Hopefully you are not discouraged by the issues you're running into. It's part of the process if you want to keep going.

You're never too old to learn, right? :)
Better to learn on a generic brush than a Micron :)
My two generics that I started with taught me a LOT! I haven’t damaged a single airbrush since buying ‘good ones’ so the generics have saved me money :)
 
Hopefully you are not discouraged by the issues you're running into. It's part of the process if you want to keep going. You're never too old to learn, right? :)
Not discouraged at all but I take learning this and other new things as a personal challenge. Actually, I am somewhat ADD in a way so I always like to learn new things and when I am in the process as I am now with learning airbrushing, I will spend hours reading and watching videos on the subject.

My interest in airbrushing dates way back to the early 70's when the custom car and van paint scene was alive and thriving. So, I have since those days wanted to learn to use an airbrush. I build and fly airplanes known as "foamies". They mainly consist of construction using Dollar Tree foamboard. In the past, I have always just used colored duct tape to decorate them with but I am ready to make them stand out. I will be using only acrylic paint for all of my airbrushing which is good since I can buy it cheap at the local Walmart.

I am proficient in the use of production type sprayers as I have experience in furniture finishing and restoration. My last occupation was being a graphics designer at a sign shop. I was in the graphics business for nearly 15 years.

Yes, this old dog is ready to learn a lot of new tricks. :thumbsup:
 
Better to learn on a generic brush than a Micron :)
My two generics that I started with taught me a LOT! I haven’t damaged a single airbrush since buying ‘good ones’ so the generics have saved me money :)
That is the way I am looking at the learning process. Start small and cheap and work my way up.
 
I saw this a while back, I watched a load of Foam plane builds and found them very interesting. Is this the type of build you do.

 
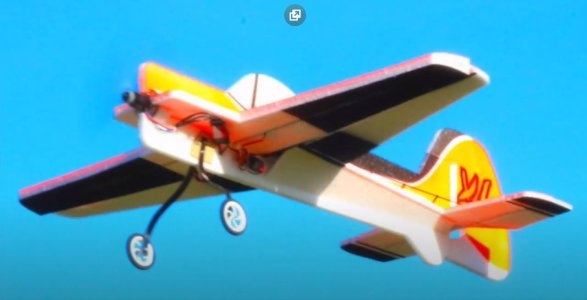
No, that is a more traditional build. The one I am building now was a kit I bought. It is made from pre cut EPP foam.

Yak55 side view.JPG

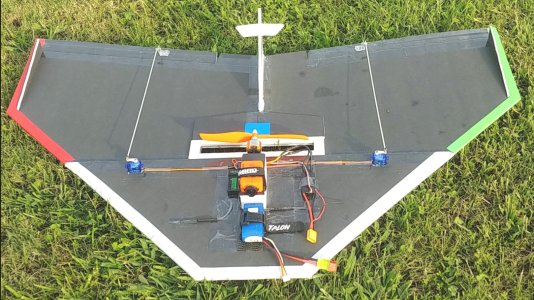
The ones I usually build are made from foam core poster board I buy at the Dollar Tree store. They are easy and cheap to build
and a whole lot of fun to fly. They are called "Foamies". Here is a picture of one called the "Simplest Simple Delta" that I recently built.

SSD 40 .2.JPG

Both planes have a 40" wingspan.
 
Last edited:
Well, I am thrilled with all of the help, suggestions and kindness I have received here in this forum. That being said, I have a new airbrush coming my way thanks to the generosity of one of the forum members.

crazyvet
has generously offered to give me one of his Master Airbrush G23 airbrushes to help get me started. I am looking forward to receiving it and putting it to good use.

Thank you crazyvet for your offering and kindness! :thumbsup: :D
 
Back
Top