Paasche AB Generational differences and mild troubleshooting

Drastion

Young Tutorling
I got a Passive AB airbrush recently. Its a bit worn and someone carved their initials into it. But it was the right price and I got it to use not as a collector's piece.

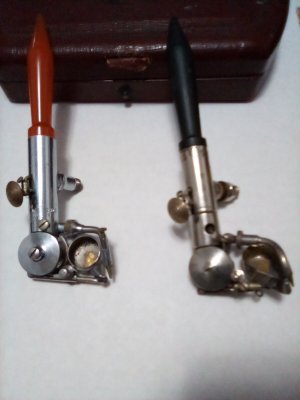
Now that I have something to compare it to. One came in a black rectangular wooden box and has a totally different construction. The other one in a Oval ish shaped metal one and had the same handle shape but in a clear colored plastic.

Strange thing is the older one has what looks like cotton wading in it like it is ment to run on oil and not grease.

The newer one does not spin up at all. I am guessing it is because the bottom bearing is set way to low and causing the walking arm to drag on the housing and preventing anything from happening.

Also the trigger has a large dead spot in it. Where it does not engage anything until I move it a bit forward.

What is a good procedure to taking one of these apart if I need to?

The top of the housing isn't bolted down like the older one. So I assume I just pop it off as it looks like there are mars in the top cover from someone putting a screwdriver in there and twisting it to open the top.

I assume I at least do not want to have the top bearing in when I put it back together. So if it is not aligned properly the bearing does not slam into the cam post on top.

Appreciate any advice I can get. I am not worried much about taking it apart. But have learned or at least trying to learn not to do things impulsively as bad things tend to happen when I do.
 
I am not an AB turbo owner but there are a few on here with then that they have up and running who I am confident will help you

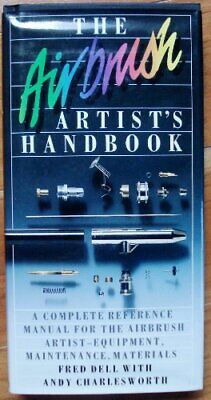
If you start by posting some pictures of what you have that nay help. I have a book which details a disassembly and reassembly of an AB turbo but only one type. You can pick them up second hand

 
My bad. I wasn't sure if I needed to be at a certain post count to put attachments up.
IMG_20240317_064709.jpg

The one with the orange handle on the left is the one I am having troubles with. The one on the right works fine. So I am hoping is I set them both up the same way the new one will start behaving itself.
 
They are both very simple to take apart, so rest assured, just take it slow as not to lose parts. The only tricky part is the walking arm screw. You'll need to use a rubber band to hold the trigger back, exposing the screw head to remove it. Leave the screw in place and it will keep the piston from falling out the back (there a spring in there, don't lose it if and when you pull the piston.

The bearings are tungsten, which is extremely tough, but they are brittle, don't force them if they don't move freely. Getting one out when the screw tab snaps off is a nightmare. So don't worry about hurting one regarding moving the turbine cover.

The ideal place that I've found is dial the lower up until the walking arm is moving freely and then dial the upper down until it stops and back off a bit. You can run the brush without the covers and upper bearings. The turbine will spin, but there will be a vibration. It's not a bad thing to try just to see the action and let you wrap your head around the way it works.

The black handled one is older and has a brass arm that holds the bearing in place. You'll see that sectioned part of the body thats held in with a screw, that will allow you to remove the top and get the bearing off the wheel. You'll see the wheel is also a different design than newer ones, a brass wheel with indentations as opposed to a serrated edge of later models.

Paasche recommends Vaseline, Dave uses Poly Urea grease which is what I started to use.

And to further assuage any fears, Paasche still sells the bearings, wheels (the shaft bearing in teh wheel assembly fit the older wheels like you have), need bearings, walking arms, etc.

The other difference between your brushes is the orange handled one has a removable needle bearing, the little tablet shaped gray piece. you can change it, rotate it, adjust at will.

The hardest thing to understand about these are it's like playing Jenga. It's a true balancing act. Bearing angle, needle shape, needle drag, turbine speed, bearing pressure, grease type and amount, air blast tube opening and aim all change and are dependent of each other. Takes a while to dial it it. Paint viscosity is important too, play around a lot before you try something important. You might fight a lot of dripping off teh needle bearing if things aren't dialed in correctly.
 
The only frustrating part about assembly will be the walking arm, the piston rotates, you need to hold the arm at the right angle while screwing it in. It's a very small area on the arm to grip and you don't want to mess up those threads. That's why I recommend securing the trigger back with a rubber band, to take one motion out of the equation.

You do pry the turbine cover up on the Orange, it's press fit, do it gently the first time until you gain confidence. The black one, remove that screw next to the trigger and pop off the whole assembly. I can't remember how that cover is connected, I lost mine years ago and run it without the cover, just the brass arm holding the bearing. For years I ran it without the upper bearing doing anything since the shaft top was broken when I got it. It just kind of sat on top and kept the wheel from falling out.Once I discovered the shaft bearing/cam is interchangeable with a new one, I swapped it out (you'll need to slightly widen the walking arm cam slot if you go that route).
 
Here's what your black one acts like under the cover:

To view this content we will need your consent to set third party cookies.
For more detailed information, see our cookies page.
 
I am not an AB turbo owner but there are a few on here with then that they have up and running who I am confident will help you

If you start by posting some pictures of what you have that nay help. I have a book which details a disassembly and reassembly of an AB turbo but only one type. You can pick them up second hand

Thanks for the link. For that price I couldn't pass it up.
They are both very simple to take apart, so rest assured, just take it slow as not to lose parts. The only tricky part is the walking arm screw. You'll need to use a rubber band to hold the trigger back, exposing the screw head to remove it. Leave the screw in place and it will keep the piston from falling out the back (there a spring in there, don't lose it if and when you pull the piston.

The bearings are tungsten, which is extremely tough, but they are brittle, don't force them if they don't move freely. Getting one out when the screw tab snaps off is a nightmare. So don't worry about hurting one regarding moving the turbine cover.

The ideal place that I've found is dial the lower up until the walking arm is moving freely and then dial the upper down until it stops and back off a bit. You can run the brush without the covers and upper bearings. The turbine will spin, but there will be a vibration. It's not a bad thing to try just to see the action and let you wrap your head around the way it works.

The black handled one is older and has a brass arm that holds the bearing in place. You'll see that sectioned part of the body thats held in with a screw, that will allow you to remove the top and get the bearing off the wheel. You'll see the wheel is also a different design than newer ones, a brass wheel with indentations as opposed to a serrated edge of later models.

Paasche recommends Vaseline, Dave uses Poly Urea grease which is what I started to use.

And to further assuage any fears, Paasche still sells the bearings, wheels (the shaft bearing in teh wheel assembly fit the older wheels like you have), need bearings, walking arms, etc.

The other difference between your brushes is the orange handled one has a removable needle bearing, the little tablet shaped gray piece. you can change it, rotate it, adjust at will.

The hardest thing to understand about these are it's like playing Jenga. It's a true balancing act. Bearing angle, needle shape, needle drag, turbine speed, bearing pressure, grease type and amount, air blast tube opening and aim all change and are dependent of each other. Takes a while to dial it it. Paint viscosity is important too, play around a lot before you try something important. You might fight a lot of dripping off teh needle bearing if things aren't dialed in correctly.
Appreciate the lengthy reply. I am not the best at translating what is in my head.

Does the flywheel stay centered well? What I am worried about is if the point on the cam shaft does not find the center of the bearing. So when I close it back up it ends up on the side and I crush it putting the lid back on instead of it sliding into the bearing cavity.

Also thanks for the info on the needle bearing. The older one is just a cutout in the metal and I was trying to figure out how you were able to change the angle of the cup without binding the needle.
The only frustrating part about assembly will be the walking arm, the piston rotates, you need to hold the arm at the right angle while screwing it in. It's a very small area on the arm to grip and you don't want to mess up those threads. That's why I recommend securing the trigger back with a rubber band, to take one motion out of the equation.

You do pry the turbine cover up on the Orange, it's press fit, do it gently the first time until you gain confidence. The black one, remove that screw next to the trigger and pop off the whole assembly. I can't remember how that cover is connected, I lost mine years ago and run it without the cover, just the brass arm holding the bearing. For years I ran it without the upper bearing doing anything since the shaft top was broken when I got it. It just kind of sat on top and kept the wheel from falling out.Once I discovered the shaft bearing/cam is interchangeable with a new one, I swapped it out (you'll need to slightly widen the walking arm cam slot if you go that route).
What are the reasons to remove the arm?
Can i damage it trying to raise the flywheel up or is it more for a deep clean kind of thing?

Would using some needle nose pliers be best for removing to cap? Since it has rounded surface and hopefully would not dig into the metal when twisting it to push the lid up.
 
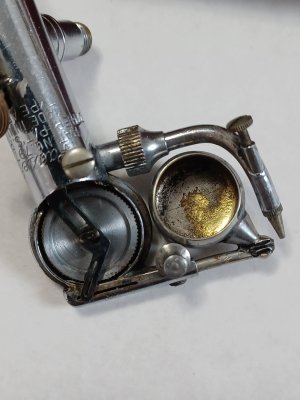
OK, I got the scary part over with taking the cover off. Used to being in a industrial setting so I don't have to most delicate touch when it comes to things.20240317_174255.jpg
Now I am a bit confused. Hopefully it show up in the picture. I see what the problem is. The cam has a "key" on it that goes through the walking arm. But for some reason the arm wants to angle up and locks the key inside the arm.

I still need to get the fly wheel aligned with the blow hole and clear out a bunch of stray really thick grease around the inside of the wheel chamber. But now I am a bit lost about what to do.
 
I didn't have a small enough screwdriver to remove the walking arm. So I just kept trying to adjust the bottom bearing to align it with the air flow port.

Messing with it so much it seems like it wasn't lifting so much as the walking arm plunger was twisting changing the angle with the cam.

Next I removed a ton of bellybutton lint from around the plunger arm and the walking arm connection point. Gentle touch with a needle and a piece if paper to get in between the plunger and walking arm.

It spins up MUCH better now. Teasing back the trigger gets it going if it does not start right away. It vibrates a but since it does not have the stabilization of the to bearing.

Now the cover seems impossibly hard to put back on. It is missing the lower c part on the cover. So it may have been bent up a bit to cause that to break off. Gave me a shock when I launched it onto the air taking it off. It has a bunch of gouge marks on the inside cover from whoever was really trying to take off the cover. Makes me think they didn't realize the cover had the undercut part and was trying to pry on it with the undercuts stopping them from lifting up the cover.
 
I recently picked up a 2nd AB, from around the 40s, with a bent walking arm. Under the cover it looks just like the picture you posted. The bend caused the arm to move upwards when pulling back the trigger and hit the key just like you said. Once I was able to take it off and bend it back straight it worked as it should. If the bearings are set right the little key shouldn’t interfere with the walking arm. There’s a really good AB maintenance manual explaining how to set the bearings just right.
https://airbrushforum.org/resources/the-paasche-ab-airbrush-maintenance-manual.22/

I recommend getting some plastic pry tools as well if you don’t want to damage the turbine cap when removing it. Soft grip pliers are also great for removing things without damage. I don’t know how far you want to go as far as cleaning but when I get these old ABs I make sure the bearings/turbine and walking arm are throughly cleaned and polished, just to ensure everything runs smoothly. Hope you can get her working again!
 
Back
Top